

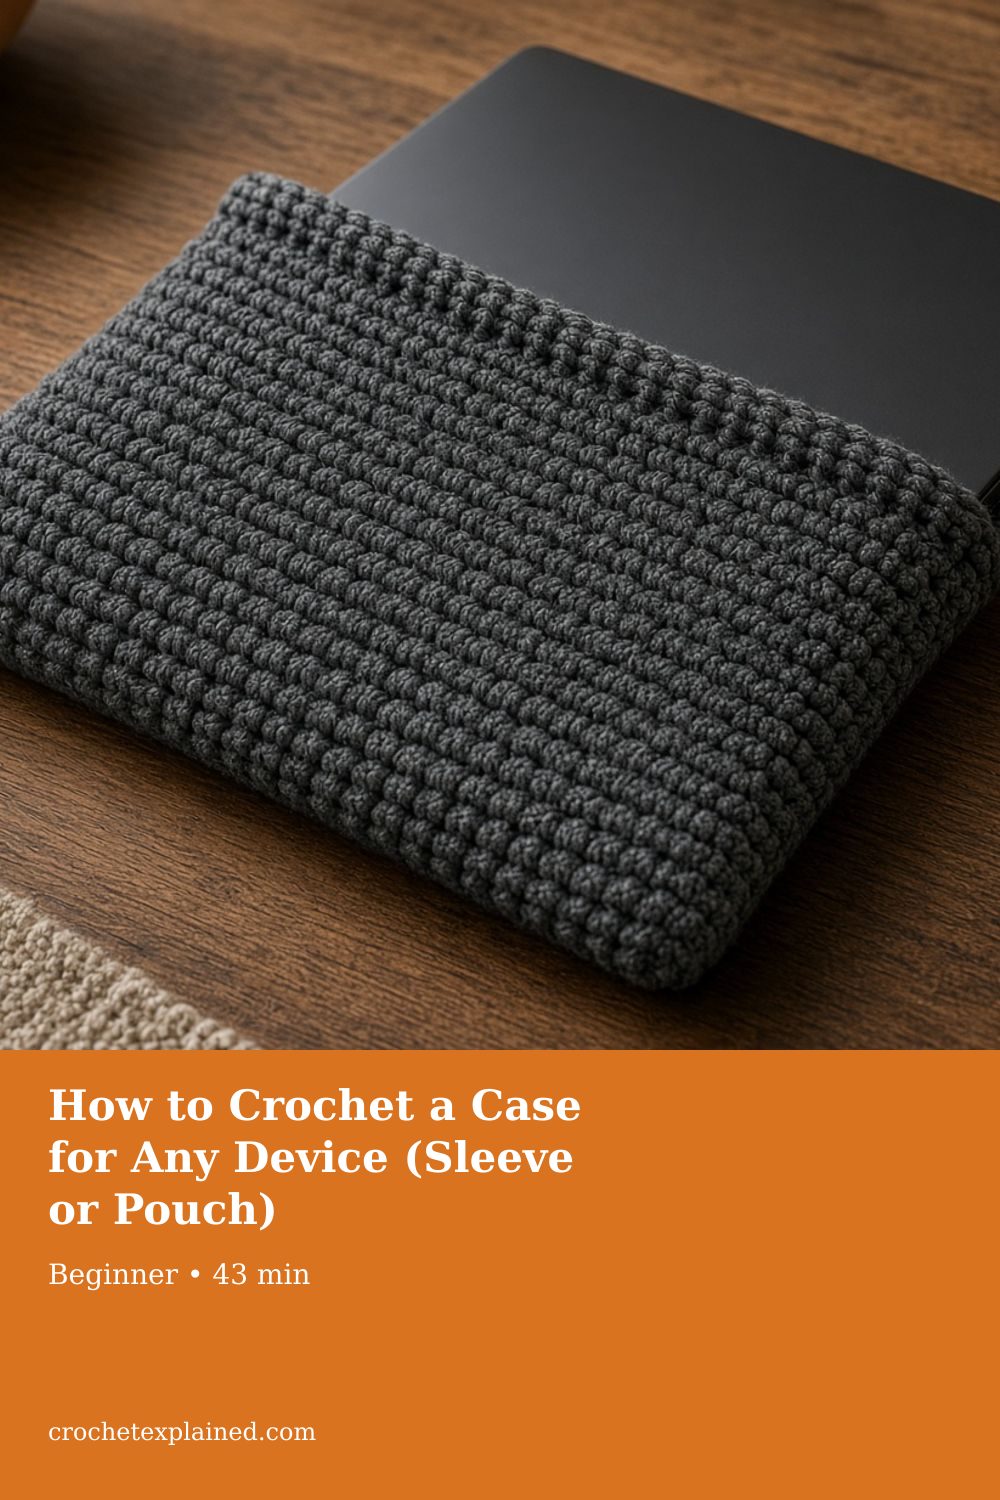
How to Crochet a Case for Any Device (Sleeve or Pouch)
Measure the device. Fold a flat sleeve for a laptop, book, or tablet, or work a round pouch for earbuds or a lip balm.
One method per shape: fold a flat sleeve for a laptop, book, or tablet, or work a round pouch for earbuds or a lip balm. Sized from your device. US terms.
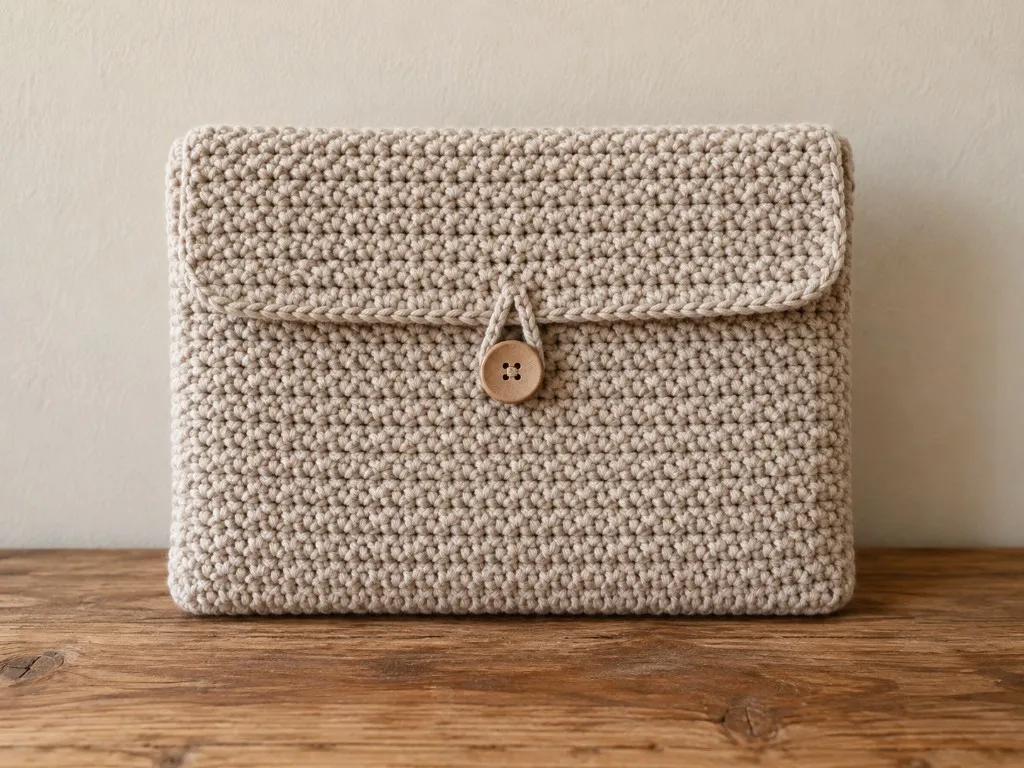
At a glance
- Skill level
- beginner
- Time
- A folded rectangle, or a round base and a tube
- Finished size
- Worked from your own device, not a fixed pattern size
- Yarn weight
- Smooth worsted cotton
- Hook size
- The hook that gives you firm fabric at your gauge
- Yardage
- Weigh a gauge swatch and multiply; small projects
On this page
- Which construction does your device need
- The one thing both methods share: gauge
- How to measure the device in your hand
- Method 1: a folded sleeve for flat devices
- What a failed fold looks like, and how to correct it before you finish
- Method 2: a round pouch for small gear
- How to keep the round count, and what a failed base or eyelet looks like
- Fit the base footprint before building a tube
- Troubleshooting
- Care
- Frequently asked
- Next
Track your progress
- Go to Fold, seam, and try the device before you weave in ends
- Go to What a failed fold looks like, and how to correct it before you finish
- Go to How do I seam without cupping the side?
Ticks are saved on this device only. Counting rows? Keep the stitch counter open in another tab.
US crochet terms throughout. Sizes here are worked out from gauge rather than from a finished sample, so swatch and measure as you go, and the pictures of finished pieces are illustrations. Made one? Send a photo through the contact page.
Almost every crochet case pattern hands you one stitch count and hopes your phone, your earbuds, or your paperback happens to match it. They rarely do. This guide works the other way round: you measure your device, pick the construction that suits its shape, and size the piece from your own gauge.
Two constructions cover nearly everything small enough to carry.
US terms throughout. US single crochet is UK double crochet. See the abbreviations chart if a term is new. The sizes are worked out from an example gauge rather than from a finished sample, so swatch first and slide your device in before you sew anything shut. None of these counts is a promise about your yarn.
Which construction does your device need
The shape of the object decides the method. Do not pick by what the object is called.
- Flat and rigid — a laptop, a tablet, an e-reader, a paperback. Fold a rectangle and seam the sides. Jump to Method 1.
- Small and bulky, with a round-ish footprint — an earbud case, a lip balm, a small power bank. Work a round base and a straight tube. Jump to Method 2.
- A phone. A phone is flat, so it uses Method 1, but it is the most common case people want and it has its own worked page: how to crochet a phone case.
- A tapered travel cup that is wider at the top than the bottom needs shaping a straight tube cannot give. That is a tumbler sleeve.
- A coiled cable needs a strap and a buttonhole, not a pocket: the cable organizer.
- A drawstring makeup or coin pouch where the opening gathers shut is a different closure again: the drawstring pouch guide.
None of these is waterproof, and none is drop protection. Single crochet has gaps, and yarn does not absorb a fall. A crochet case is a soft cover that keeps lint, scratches, and loose keys off your gear. Say so to anyone you give one to.
The one thing both methods share: gauge
Measure your swatch, not the example’s
- Everything below is arithmetic on top of your gauge, so the gauge has to be yours, not the example’s.
- Crochet a flat swatch about 4 inches square in the yarn and hook you will use, then measure the middle.
- The example gauge in this guide is 4 single crochet and 5 rows to the inch in smooth worsted cotton on a US G/6 (4.0 mm) hook.
- If your swatch comes out at 3.5 stitches to the inch, your counts change, and that is the point.
- Crochet gauge walks through measuring it.
Pick a firm cotton and a smaller hook
- Smooth worsted cotton is the easiest choice here. It is firm, it holds a stitch shape, and it does not shed into a charging port or a speaker mesh the way a fuzzy acrylic does.
- Pick a hook a size or two smaller than the yarn label suggests, because a case wants denser fabric than a scarf.
- Yarn weights and the hook chart have the ranges.
A fuzzy acrylic sheds into a port and a speaker mesh. Smooth worsted cotton holds the stitch. Drop a hook size or two from the label if the swatch looks like scarf fabric.
How to measure the device in your hand
Measure it closed
- Close it. A laptop measured open is the screen plus the keyboard, and the sleeve is then twice as wide as the machine.
- A book measured open is the same mistake.
- You want the closed width, the closed height, and the thickness at the thickest point.
- On a paperback the thickest point is the spine. On a laptop it may be the foot or the port side rather than the middle of the lid.
- Use a ruler or a cloth tape that lies flat.
- The diagonal printed on a box is the corner-to-corner size of a screen, and it is longer than the width.
The laptop and the paperback are three numbers each
- The laptop example on this page is 12 by 8.5 by 0.6 inches.
- Twelve is the width, 8.5 is the height, 0.6 is the thickness. None of those is a diagonal.
- The paperback example is 5 by 8 inches, and the spine used in the sum is 0.5 inch.
- Measure the spine. A thick paperback and a thin one do not share a chain.
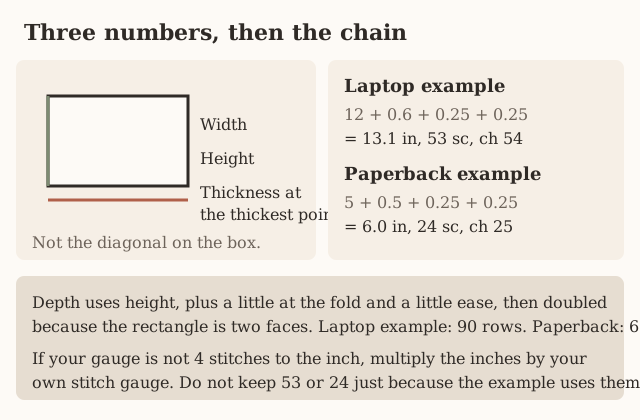
Write the three numbers, then add what the sleeve needs
- Write the three numbers on a card before you multiply.
- Width of fabric equals device width, plus thickness, plus 0.25 inch for the seams, plus 0.25 inch of ease.
- The laptop sum is 12 + 0.6 + 0.25 + 0.25 = 13.1 inches, 53 single crochet, chain 54, at 4 stitches to the inch.
- The paperback sum, for a 0.5 inch spine, is 5 + 0.5 + 0.25 + 0.25 = 6.0 inches, 24 single crochet, chain 25.
- If you leave the thickness out, the device will not pass the opening.
- Seams do not add fabric later. That is why the troubleshooting line says to start wider.
| Piece | Sum at the example | Stitches at 4 to the inch | Chain |
|---|---|---|---|
| Laptop width | 12 + 0.6 + 0.25 + 0.25 = 13.1 in | 53 single crochet | 54 |
| Paperback width, 0.5 in spine | 5 + 0.5 + 0.25 + 0.25 = 6.0 in | 24 single crochet | 25 |
Depth doubles, because the rectangle is two faces
- Depth per side starts from height.
- The laptop adds 0.3 inch at the fold and 0.2 inch of ease, so 8.5 + 0.3 + 0.2 = 9.0 inches a side.
- The rectangle is both sides, 18 inches, 90 rows at 5 rows to the inch.
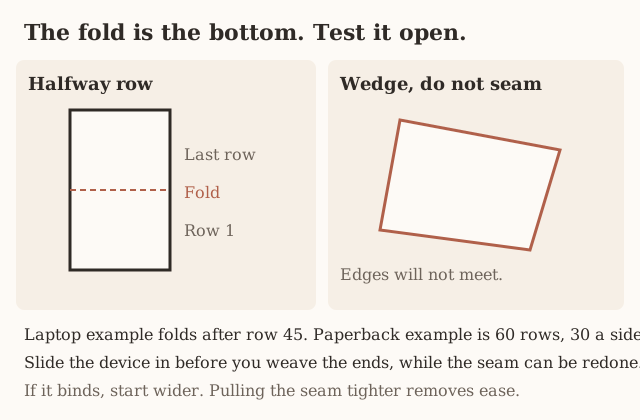
- The fold is the halfway row, row 45.
- The paperback example chooses how much of the cover stays visible: three quarters of 8 inches is 6 inches of sleeve, 12 inches of fabric, 60 rows.
- Half of 60 is 30, the fold.
- If you want less of the cover showing, you need more rows, and the total still has to split into two equal faces.
| Piece | Depth math | Rows at 5 to the inch | Fold |
|---|---|---|---|
| Laptop | 8.5 + 0.3 + 0.2 = 9.0 in a side, 18 in of fabric | 90 | Row 45 |
| Paperback | 6 in of sleeve, 12 in of fabric | 60 | Row 30 |
Your gauge replaces the 4 and the 5
- A 13.1 inch width at 3.5 stitches to the inch is not 53 stitches.
- Multiply 13.1 by your stitches per inch and round to a whole stitch.
- The row count is the doubled depth times your rows per inch.
- Crochet gauge is how to get those two rates from a swatch measured in the middle, lying flat.
- Write them on the same card as the device numbers.
- A later sitting will not remember which hook matched.
Fifty-three stitches is a 13.1 inch width at 4 stitches to the inch. At 3.5 stitches to the inch that same 13.1 inches is a different chain. Do not keep 53 because it is printed here.
A phone uses the same sum, not the laptop’s chain
- A phone is flat, so it uses this same sum, and the worked phone page is how to crochet a phone case.
- A strap bag that is also a folded sleeve uses the same body and then adds a strap. That is the strap bag.
- Do not measure a phone by the box diagonal and then follow the laptop’s 53 stitches.
- Fifty-three is a 13.1 inch width.
A bulky object is measured around
- For a small bulky object you will switch to Method 2, and the number you write down is different. You need the distance around, not only the width.
- An earbud case example is 1.9 by 0.9 by 2.4 inches: perimeter 2 times (1.9 + 0.9) = 5.6 inches, plus about an inch of ease, 27 stitches at 4 to the inch, and about 13 rounds of wall.
- A lip balm example is 0.65 inch across, times 3.14, which is 2.04 inches around, and 9 stitches.
- Write “around” on the card so you do not feed a width into a tube.
- The rest of Method 2 is that tube. Get the number before you make the ring.
Method 1: a folded sleeve for flat devices
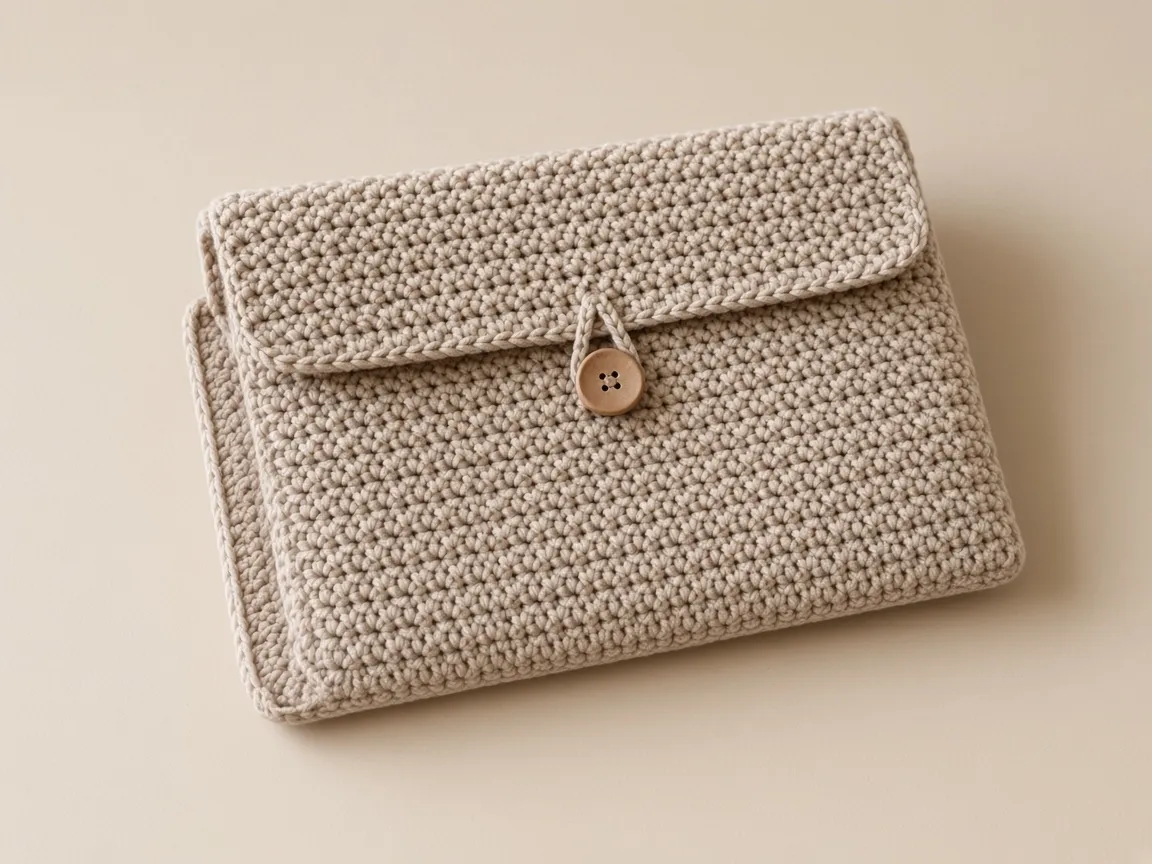
A flat sleeve is a single rectangle, folded in half, seamed up both sides, open at the top. The stitch count sets the width of the opening. The row count, folded in half, sets how deep the device sits. The fold becomes the bottom.
Measure the device, then add its thickness to the width
Width is the face plus the thickness
- Close the device and measure three things: its width, its height, and its thickness at the thickest point.
- The mistake that ruins a folded sleeve is sizing the width to the flat width only.
- The fabric has to wrap around the edges, so each face of the sleeve must cover the width plus the thickness, plus a little ease and a stitch for the seams.
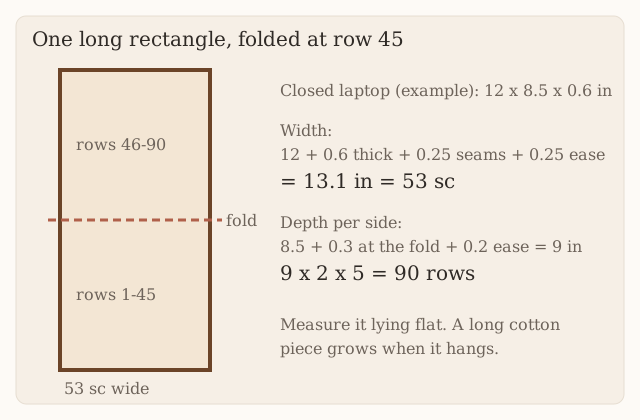
Worked example, a 12 x 8.5 x 0.6 inch laptop, at 4 stitches and 5 rows to the inch:
- Width: 12 + 0.6 thickness + 0.25 seams + 0.25 ease = 13.1 in, so 53 single crochet, chain 54.
- Depth per side: 8.5 + 0.3 at the fold + 0.2 ease = 9.0 in. The fabric is twice that before folding, so 18 in, which is 90 rows.
- The fold is after row 45.
Worked example, a 5 x 8 inch paperback, same gauge:
- Width: for a 0.5-inch-thick paperback, 5 + 0.5 thickness + 0.25 seams + 0.25 ease = 6.0 in, so 24 single crochet, chain 25.
- Measure the spine of any book. Thickness is part of the calculation, not an optional hardcover allowance.
- Depth: choose how much of the cover stays visible. Three quarters of 8 in is 6 in of sleeve, so 12 in of fabric before the fold, which is 60 rows.
- The fold is row 30.
An e-reader is the same sum with its own three numbers
- An e-reader or small tablet is the same sum with its own three numbers.
- Measure. Do not guess from the screen size on the box. That is a diagonal, not the width.
- On a thin tablet the thickness added to the width is a quarter inch. On a laptop, more.
Work the rectangle, keeping the count honest
Chain your width-plus-one. For the paperback example that is chain 25.
Row 1: Single crochet in the second chain from the hook and in each chain across. Chain 1, turn. (24)
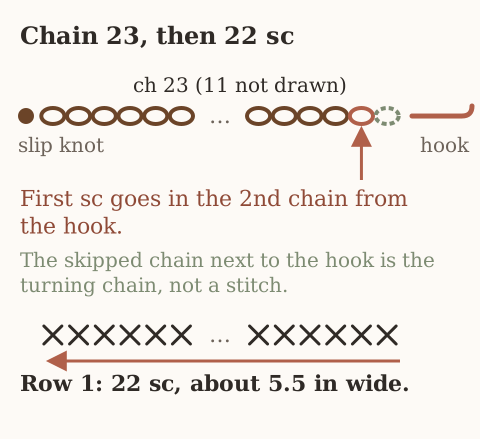
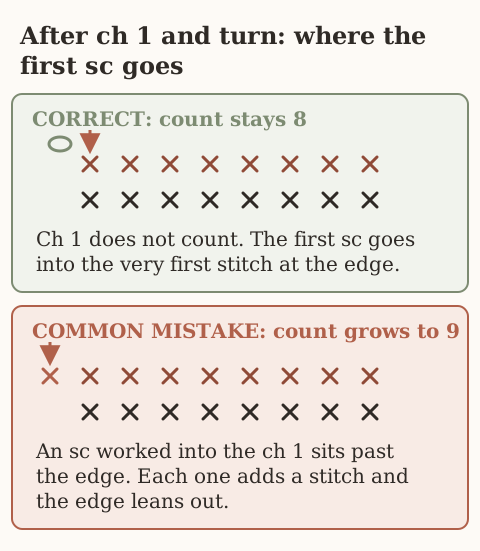
Every following row: Single crochet in each stitch to the end. Chain 1, turn. The chain 1 is not a stitch.
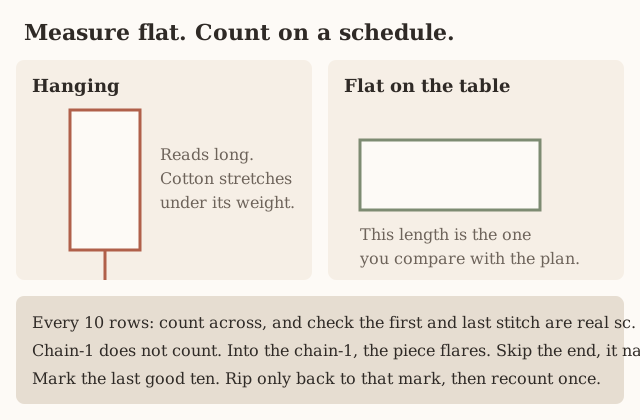
Count across every ten rows, flat
- Count across every ten rows.
- On a long piece, measure it lying flat, not hanging off your lap.
- Cotton stretches lengthwise under its own weight and reads long while it hangs.
How to keep that count, and what a drifted row looks like
The first row and the last row have to match
- The laptop rectangle is 53 stitches for 90 rows.
- The paperback is 24 stitches for 60 rows.
- The diagram that shows a foundation of chain 23 is a 22-stitch row, 5.5 inches at 4 stitches to the inch.
- Whichever width you are on, it has to be the same number on row 1 and on the last row.
- A single gained stitch, copied up a 90-row piece, is a wedge. The fold will not meet.
Chain one more than the stitches
- Chain 54 for 53 single crochet.
- Chain 25 for 24.
- Chain 23 for 22, on the diagrammed width.
- The chain next to the hook is skipped. It is not a stitch.
- If row 1 is one stitch long, you included it. Rip row 1.
- Do not decrease on row 2 to hide it.
| Plan | Chain | Row 1 |
|---|---|---|
| Laptop | 54 | 53 |
| Paperback | 25 | 24 |
| Diagrammed width | 23 | 22, which is 5.5 inches at 4 stitches to the inch |
A decrease on row 2 leaves a bump at the corner, and the corner is part of the opening the device has to pass. Rip row 1 instead.
The turning chain is not a stitch
- Every later row turns with chain 1, and that chain does not count.
- The turning chain is why edges slant.
- After the chain and the turn, the first single crochet goes into the first stitch of the row below.
- The chain sits beside it.
- Working into the chain adds a stitch and the edge flares.
- Skipping the last stitch, because it hides under the hook, narrows the edge.
- Put a marker in the first and last stitch and move it up each row so the chain and the stitch cannot be confused.
Count in groups, then look at the ends
- Fifty-three is five groups of ten and three leftover.
- Twenty-four is two groups of ten and four.
- Twenty-two is two groups of ten and two.
- When the count is short or long by one, look at the ends before you recount the middle.
- Single crochet rarely gains a stitch in the center.
- When it is off by more than one, spread the row and look for two stitches coming out of one loop. That is an accidental increase. Rip back to it.
| What the edge does | Usual cause |
|---|---|
| Flares, wider at the top | The first single crochet went into the chain-1 |
| Narrows toward the top | The last stitch was skipped |
| Off by more than one | Two stitches came out of one loop. Rip back to that increase. |
Mark every ten rows, and mark the fold
- Mark the edge every ten rows with waste yarn or a clip, and write the number down.
- The laptop piece needs marks through 90, so the last mark is 90, not a guess after 80.
- The paperback needs 60.
- The halfway marks matter as much as the total: row 45 of 90 is the laptop fold, row 30 of 60 is the paperback fold.
- If you stop at 89 or 61, add or remove a row so the total splits into two equal faces.
- An odd total cannot fold into two whole-number faces of the same depth.
Measure flat at the same marks
- At each ten-row mark, measure flat on a table.
- A piece hanging off your knee reads long.
- If you trust that number you will stop early, and the device will stick out of the sleeve.
- The laptop plan is 18 inches of fabric, 90 rows at 5 rows to the inch.
- The paperback plan is 12 inches, 60 rows.
- If your flat piece is already longer than that at the planned row, your row gauge is taller than the example. The sleeve will be deeper.
- Deeper can still fit. Shallower, from stopping early, is the failure.
- Write the flat length next to the row number.
A long cotton rectangle grows when it hangs off your lap. The length to compare with the plan is the same piece flat on the table.
Rip to the last good mark
- If row 40 is the last row with the right stitch count, rip to row 40.
- Do not decrease the extra stitch on row 41 and continue.
- The rows below stay wide, the edge still slants, and the two faces will not pin together.
Join a new ball at the side edge
- Joining a new ball belongs at the side edge, with a long tail, not in the middle of the face that will lie on a screen.
- Weaving in ends is for after the device has been in and out and you know the seam will stay.
- A color change is also an edge join.
- Changing yarn color shows the loop.
- The change row still has the same stitch count.
Fold, seam, and try the device before you weave in ends
Fold so row 1 meets the last row
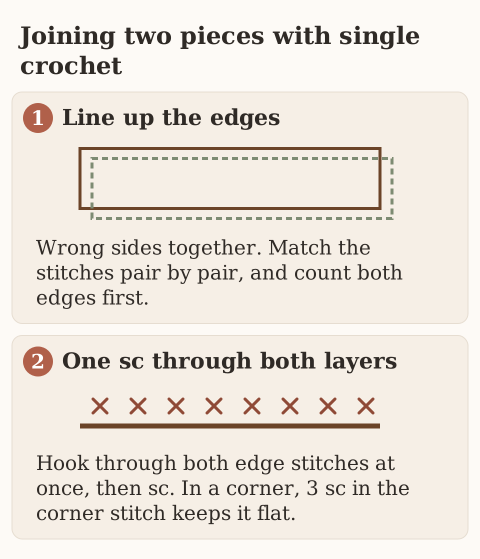
- Fold so the first row meets the last row, right sides together. The fold is the bottom.
- Single crochet or whipstitch through both layers up each side, matching row ends, and leave the top open.
- For a sewn seam, make one whipstitch per matching pair without drawing it tight.
- For a crocheted single-crochet seam, distribute stitches to your stitch-to-row gauge: at 4 sc and 5 rows per inch, work 4 sc over each 5 paired row ends.
- Check it lies flat. Seam strength depends on yarn, stitch placement, and reinforcement, not the seam name alone.
Slide the device in before the ends are woven
- Slide the device in before you weave the ends in, while the seam can still be redone.
- It should enter without bending and stop where you planned.
- If it will not go in, the opening is too narrow.
- Seams do not add fabric, so the next rectangle needs more stitches, not a harder tug.
Button the loop with the device inside
- To keep a loose device from sliding out, sew a button to the front and chain a loop on the back long enough to reach over it with the device inside.
- Place the button only once the device is in the sleeve, not on the empty sleeve.
What a failed fold looks like, and how to correct it before you finish
Pin the corners and the center first
- Pin the first row to the last row at both corners and at the center before you commit the seam.
- The pins should meet with no stretching.
- If one layer has to be pulled, the faces are different lengths or one edge has slanted.
- Mark the halfway row first.
- On the laptop example that is row 45 of 90.
- On the paperback example that is row 30 of 60.
- The fold sits on that mark.
- A fold that has wandered makes one deep pocket and one short flap, and the device sits crooked.
The device will not go in
- The opening is the stitch count.
- Thickness was left out of the width, or the gauge was tighter than 4 stitches to the inch and you still used 53 or 24.
- Pulling the device bends it, and a laptop or a screen should not be the tool you use to stretch cotton.
- Rip the seams if you have sewn them, and start the next rectangle wider.
- The sums are at the top of Method 1.
- Adding a round of single crochet to the opening does not add the missing inches in a useful way. It thickens the edge and the device still stops.
Seams do not add fabric. A tighter seam removes ease. If the device will not enter, the next rectangle needs more stitches.
The device goes in and sticks out the top
- Too few rows. The faces are short.
- Add rows before you seam, enough that half the new total covers the height plus the fold allowance and the ease you wrote down.
- Keep the total even.
- Do not fold off-center to hide a short side.
- Do not sew a separate band across the top. A band stretches differently, and the opening the device slides through becomes two fabrics.
One side seam is longer
- That is the wedge.
- A ruler on each long edge of the flat rectangle shows the slant before you fold.
- Easing the long side into the short side locks the slant into the sleeve.
- The opening tilts, and the device scrapes one corner.
- Rip to the last ten-row mark where the width matched.
- Blocking a single-crochet cotton rectangle will not pull a wedge square.
The seam cups
- At 4 single crochet and 5 rows to the inch, a crocheted seam is 4 single crochet over each 5 paired row ends.
- One single crochet in every row end packs the side tighter than the fabric, the side shortens, and the opening bows.
- A whipstitch pulled hard does the same.
- Snug enough to hold, not tight enough to gather.
- If the cup appears while the yarn end is still free, rip the seam and redo it.
- Check that the device still enters after the seam is in.
- A seam that looked fine on an empty fold can still pinch the thickness.
| Seam at 4 sc and 5 rows to the inch | What the side does |
|---|---|
| 4 single crochet over each 5 paired row ends | Can lie flat |
| 1 single crochet in every row end | Packs tighter than the fabric. The side cups and the opening bows. |
| Whipstitch pulled hard | Shortens the side the same way |
The button loop will not reach, or it gaps
- The loop was chained on an empty sleeve.
- Put the device in, then chain the loop to the button.
- If the loop is short, add chains.
- Do not chase it by moving the button up into a single stitch in the middle of the front. That stitch tears, the same way a strap tears when it is sewn through one corner on the strap bag.
- If the loop is so long the top gaps, shorten it before you weave the sewing yarn.
You wove the ends and then found the problem
- Unpicking a woven end means pulling the tail back out before you can rip the seam.
- Leave the ends unwoven until the device has gone in, sat at the depth you planned, and come back out without bending.
- Then weave along the seam, not across the opening.
- Weaving in ends covers the path of the tail.
- Heat is not a tool for reshaping a sleeve that is the wrong size.
- The dryer can shrink cotton until a snug case no longer fits, which is why the care section keeps the case out of the dryer.
Method 2: a round pouch for small gear
A small bulky item wants a closed round bottom and a straight tube, not a fold. Six stitches in a magic ring grow into a flat circle. When the circle is wide enough to go around the item, you stop increasing and the walls turn up on their own.
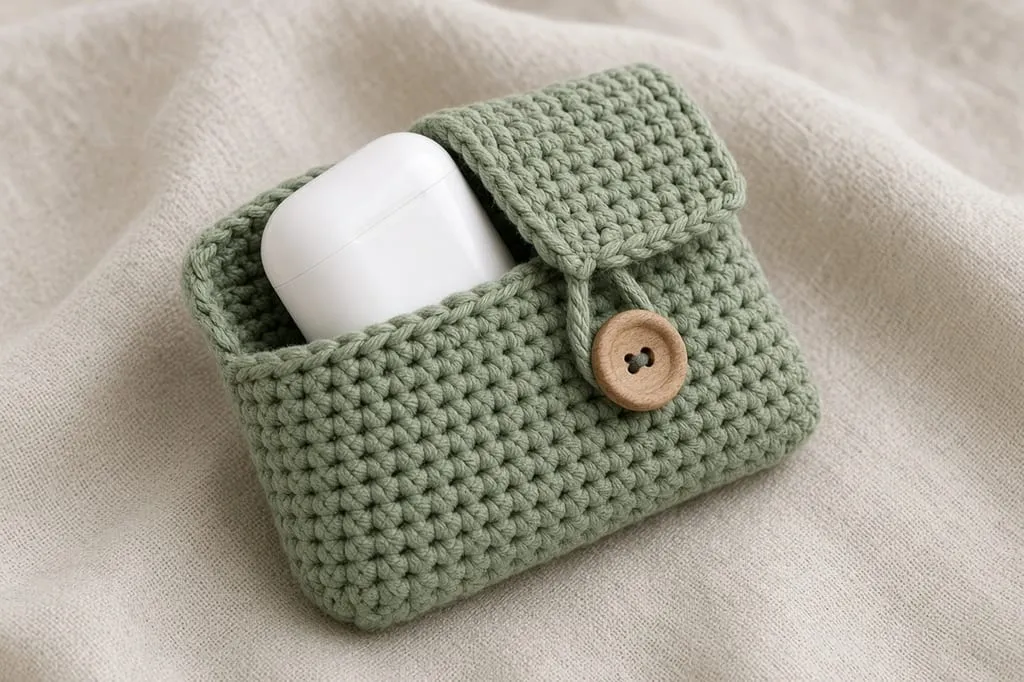
Size the tube from the perimeter, not the width
Measure around, then add ease
- The number that matters is the distance around the item, because that is what the tube has to stretch over.
- For a boxy earbud case, measure width and depth and work the perimeter: 2 x (width + depth).
- For a round lip balm, measure across and multiply by 3.14.
- Add roughly half an inch to an inch of ease so the item drops in.
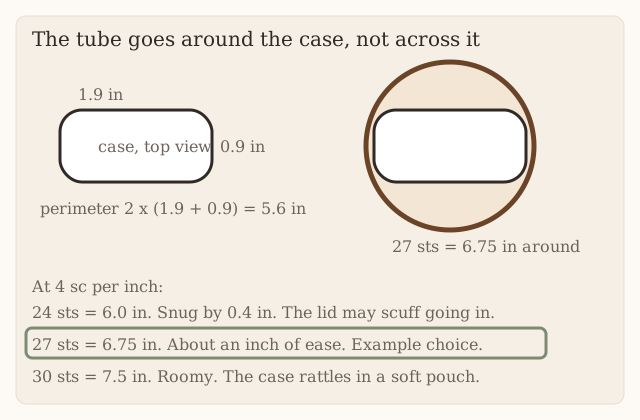
Worked example, a 1.9 x 0.9 x 2.4 inch earbud case:
- Perimeter 2 x (1.9 + 0.9) = 5.6 in.
- Plus about an inch of ease is 6.6 in, which at 4 stitches to the inch rounds to 27 stitches.
- The wall is the case height, 2.4 in plus a little, at 5 rounds to the inch, about 13 rounds.
| Stitches at 4 sc per inch | Around | Fit on this case |
|---|---|---|
| 24 | 6.0 inches | Snug |
| 27 | 6.75 inches | The example choice |
| 30 | 7.5 inches | Roomy |
Worked example, a 0.65 inch lip balm:
- Around is 0.65 x 3.14 = 2.04 in.
- 9 stitches gives about 0.2 in of ease, snug enough to hold by friction.
- Ten even rounds clears the cap.
- Nine stitches at 4 per inch is 2.25 inches around.
Work the base, then the walls
Work in a spiral without joining, and move a stitch marker up into the first stitch of each round. Working in the round explains spirals.
Round 1: 6 single crochet in a magic ring. (6)
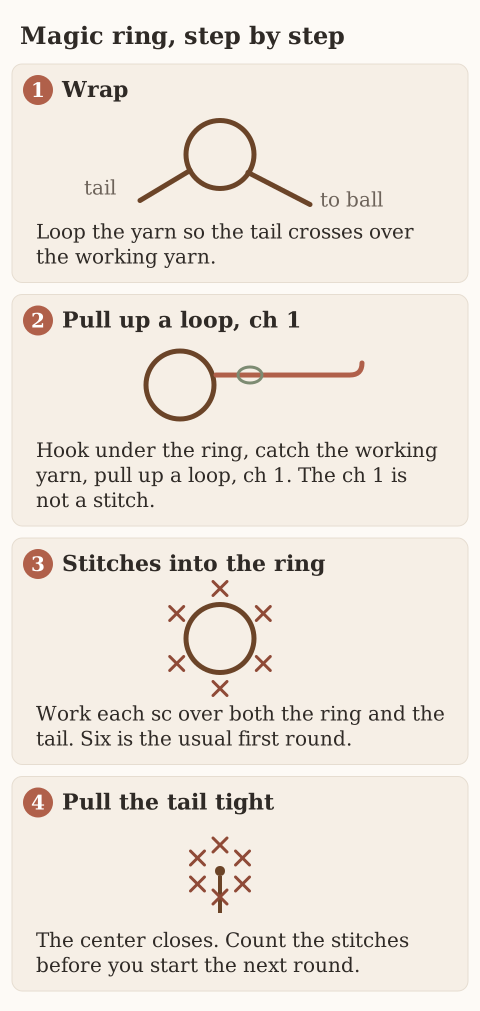
Then increase six stitches each round until the circle is as wide as your target, slowing to fewer increases on the last round if you need to land on an exact count:
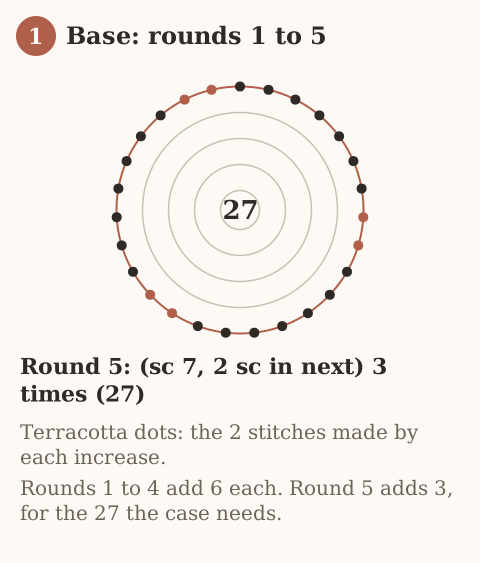
Round 2: 2 sc in each stitch. (12) Round 3: (sc, 2 sc in next) 6 times. (18) Round 4: (sc 2, 2 sc in next) 6 times. (24) Round 5, to reach 27: (sc 7, 2 sc in next) 3 times. (27)
The lip balm cups on purpose
- For the lip balm, round 2 adds only three: (sc, 2 sc in next) 3 times for 9, so the base cups on purpose and becomes the bottom of a narrow tube.
- Increases and decreases covers the shaping if it is new.
Then stop increasing and work even rounds for the wall:
Even rounds: Single crochet in each stitch, same count every round, until the item sits just below the rim.
Close it with a flap or a drawstring
A button flap is rows over part of the rim
- A button flap suits a case you open often.
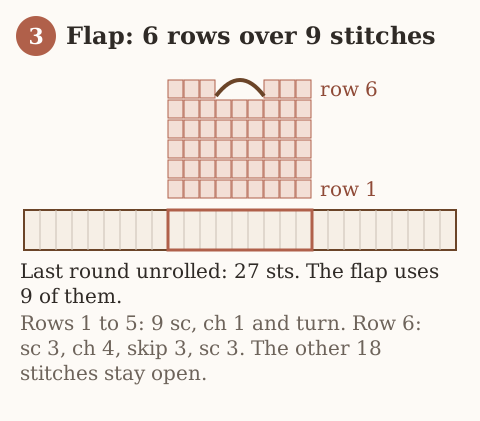
- Work a flap in rows over about a third of the rim stitches, five or six rows tall, and put a chain loop on the last row to catch a sewn-on button.
Work the flap counts as written
- The flap is 6 rows over 9 of the 27 stitches.
- Rows 1 to 5: 9 sc, chain 1 and turn.
- Row 6: sc 3, ch 4, skip 3, sc 3.
- The other 18 stitches stay open.
A drawstring needs an even count
- A drawstring suits a pouch you reach into.
- It needs an even stitch count: work an eyelet round of (sc, ch 1, skip 1) around, then thread a crocheted cord through and knot it.
- The drawstring pouch guide has the full eyelet-and-cord sequence.
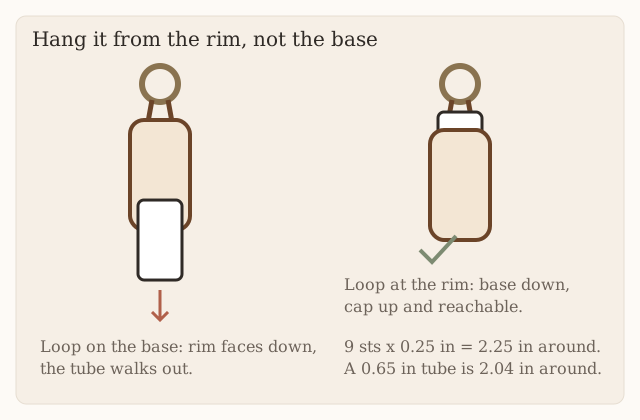
A hang loop goes at the open rim
- A hang loop turns a lip-balm tube into a keychain.
- Sew the loop to the open rim, not the closed base, so the item hangs cap-up and gravity keeps it seated.
Decorate with the item inside
- If you want to decorate a round pouch, bat wings, ears, a face, shape the appliqués separately and sew them on with the item inside so the flap still closes.
- The bat earbuds pouch works through triangle and picot shaping in detail.
How to keep the round count, and what a failed base or eyelet looks like
Move the marker every round
- Method 2 is a spiral. There is no side seam to mark the start of the round, so a stitch marker in the first stitch has to move up every round.
- Working in the round is the spiral itself.
The earbud base lands on 27 on purpose
- Round 1: 6 single crochet in a magic ring.
- Round 2: 12. Round 3: 18. Round 4: 24.
- Round 5: (single crochet 7, 2 single crochet in the next) 3 times, to 27.
- Rounds 1 to 4 add six each. Round 5 adds three, on purpose, to land on 27.
- If you work a full six increases on round 5 you will have 30, which is a different pouch.
- Count at the marker before you start the wall.
| Round 5 | Count | What you have |
|---|---|---|
| (sc 7, 2 sc in next) 3 times | 27 | The earbud example |
| A full six increases | 30 | A different, roomier pouch |
The lip balm stays at 9
- The lip balm base stops earlier and cups on purpose.
- Round 2 adds only three: (single crochet, 2 single crochet in the next) 3 times, for 9.
- Nine stitches at 4 to the inch is 2.25 inches around.
- The tube is 0.65 times 3.14, which is 2.04 inches around, so the ease is about 0.2 inch.
- Ten even rounds clear the cap.
- If you keep increasing toward a flat circle, the balm will not be held by friction.
- If you have 10 or 8 stitches instead of 9, recount the increases.
- One extra or one missing changes a snug tube into a loose one or a tube the cap will not enter.
Eight stitches will not let the cap enter. Ten stitches will not hold the tube by friction. Recount the three increases before you add rounds.
A ruffle and a bowl are different fixes
- A flat circle that ruffles has too many increases. Rip the last increase round.
- A circle that bowls before you wanted a bowl is a tight ring or tight early stitches. Loosen rounds 1 to 5.
- The magic ring should close the center hole without puckering the first round.
- A puckered center is a lump the device sits on, and for an earbud case that lump can press the lid.
- Increases and decreases shows the two-into-one stitch if you are not sure an increase happened.
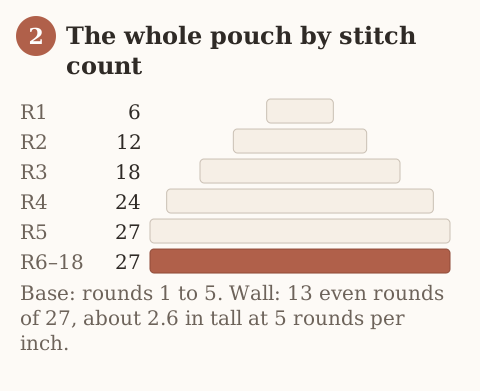
Even rounds hold 27 for about 13 rounds
- Even rounds hold the count.
- The earbud wall is about 13 rounds of 27.
- The diagram that bars the whole pouch shows rounds 6 to 18 at 27, which is those 13 rounds.
- Say 27 at the end of the first even round and again every few rounds.
- Stand the case in the tube. Stop when it sits just below the rim.
- If it already sticks out, you need more rounds.
- If the rim flares over the lid and you cannot get the case out, you have worked past the height. Rip the extra rounds.
- Do not sew the flap over a case that will not come out.
- About 13 even rounds of 27 is about 2.6 inches tall at 5 rounds per inch.
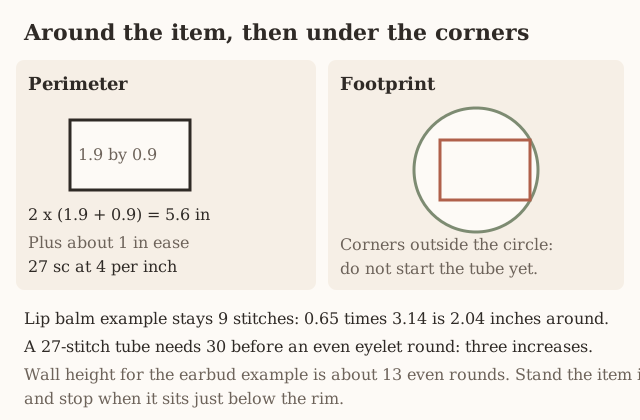
Corners hang off the circle
- The perimeter can be right and the footprint still wrong.
- A round tube around an oblong case leaves space at the sides, which the sizing diagram already notes, and soft fabric takes some of that up.
- If the corners of the case sit outside the flat circle when you set the case on it, the base is not supporting them.
- Do not start the wall and hope the tube will stretch square.
- Stretching makes four thin spots and the case tips.
- Either increase until the circle covers the corners and accept a roomier tube, or switch to the folded sleeve in Method 1.
Corners outside the circle mean this round plan will not cover them. Do not start the tube and hope it stretches square.
The flap pulls to a point or will not meet the button
- The flap is 6 rows over 9 of the 27 stitches.
- Rows 1 to 5 are 9 single crochet.
- Row 6 is single crochet 3, chain 4, skip 3, single crochet 3.
- If you gain a stitch each row, the flap widens and the chain loop sits off center.
- If you miss the 9 and work 8, the flap narrows to a point and the loop will not reach.
- Count 9 on rows 1 to 5. The chain-1 turn does not count.
- Put the case in the pouch before you sew the button, the same rule as the sleeve.
- A loop that is short gets more chains.
- A button chased up the front of the pouch ends on one stitch that tears.
| Flap rows 1 to 5 | What the loop does |
|---|---|
| 9 single crochet | The flap stays the width of those 9 rim stitches |
| 8 | Narrows to a point. The loop will not reach. |
| 10, and growing | Widens. The chain loop sits off center. |
You want a drawstring on 27 stitches
- Twenty-seven does not divide by the small eyelet repeat.
- Work (single crochet 8, increase) three times to reach 30.
- Then fifteen repeats of (single crochet, chain 1, skip 1).
- Then restore 30 on the next round.
- One single crochet in each chain-1 space is the restore. Skipping the space drops the round.
- The full eyelet-and-cord sequence is the drawstring pouch guide and the drawstring bag.
- Do not work the eyelet repeat over 27 and skip stitches until it looks even.
- The last hole will be short and the cord will bunch there.
The hang loop is on the wrong end
- A lip-balm tube hangs from the end the loop is sewn to.
- A loop on the closed base turns the sleeve upside down and the tube slides out.
- Sew the loop at the open rim so the base hangs down and the cap points up.
- Gravity keeps it seated.
- The diagram on this page shows both.
- If you have already sewn the loop at the base, cut the sewing yarn, not the tube, and sew it at the rim.
Count once more before you weave
- Count the round one last time before you weave ends: 27 for the earbud wall, 9 for the lip balm, 30 if you increased for a drawstring.
- Stand the item in.
- Open and close the flap, or pull the cord, with the item inside.
- Then weave.
- A tail woven through a flap row you still need to rip will be cut by accident if you rush.
Fit the base footprint before building a tube
Set the item on the circle before the wall
- A measured perimeter sets the wall circumference but does not ensure a round base covers a rectangular case bottom.
- Place the item upright on the base. Its corners must be supported without stretching the fabric into a different shape.
- If a round circle leaves corners outside, choose an oval or rectangular construction, or the folded sleeve.
A drawstring on this tube starts at 30
- For a 27-stitch tube with drawstring closure, first work (sc 8, inc) three times to reach 30.
- Then use fifteen (sc, ch 1, skip 1) repeats and restore thirty positions on the following round.
- Do not work an even-count eyelet repeat over twenty-seven stitches.
Troubleshooting
The device will not go in. The width (Method 1) or the stitch count around (Method 2) left out the thickness. Start wider; seams and stretching will not add real fabric.
One side of the sleeve is longer than the other. A stitch was gained on one edge. Count back to the last row that was right.
The folded piece came out long and grew longer after a week. Cotton relaxes under its own weight. Measure flat and stop a little short next time.
The round base ruffles instead of lying flat. Too many increases for the count. Ruffling means the circle is growing faster than it should.
The round base cups into a bowl too early. The ring or the first increases are tight. Loosen, or add one more increase round.
The flap pulls into a point and will not reach the button. The loop is too short or the button is too low. Lengthen the chain before you move the button.
Care
Take the device out, wash cool, dry flat
- Take the device out first.
- Hand wash cool, press the water out in a towel, and dry flat.
- Put the device back only when the cotton is fully dry. Damp cotton marks metal and cockles paper.
- Heat can shrink cotton enough that a snug case no longer fits, so keep it out of the dryer.
Do not hang a wet sleeve
- Dry the sleeve flat, not hanging by a corner.
- A wet rectangle grows the same way a dry one grows when it hangs off your lap, and it can dry at that longer length.
- The fold allowance you added, 0.3 inch on the laptop example, is not there to absorb a dried stretch.
- If the sleeve comes out longer than the flat measurement you wrote down, the next one stops a little earlier on the row count.
- Do not put the device in to hold the shape while the cotton is damp.
Damp cotton marks metal and cockles paper. The device goes back in only when the cotton is dry. Dryer heat can shrink a case that used to fit.
A round pouch dries standing, flap open
- On a round pouch, stand it upright while it dries if you want the wall to stay up, and keep the flap open so the chain loop does not dry creased shut.
- A lip-balm tube dried with the loop pulling to one side will lean.
- Shape it with your fingers, then leave it.
- The 9-stitch tube and the 27-stitch tube do not become a different count in the wash.
- They become a different inch measurement if the cotton shrinks, which is why heat stays out of the process.
Frequently asked
Will one pattern fit every device?
- No, and that is the whole point of sizing from your own measurements.
- Two cases that share a width can differ by half an inch around, which is the difference between dropping in and not fitting.
- The laptop example is 12 by 8.5 by 0.6 inches: 53 single crochet and 90 rows at 4 stitches and 5 rows to the inch.
- The paperback example, with a 0.5 inch spine, is 24 single crochet and 60 rows.
- A phone, a tablet, and an e-reader each bring their own three numbers.
- Measure the closed device. The diagonal on the box is not the width.
Which method is easier for a first project?
- The folded sleeve. It is straight rows and two seams, with no shaping.
- The round pouch adds a magic ring and increases, which the working in the round page covers.
- If the object is flat and rigid, a laptop, a book, a tablet, stay with the rectangle even if the round pouch looks smaller and faster.
- A round base under a flat rectangle leaves the corners unsupported.
Can I sell what I make?
Finished cases, yes. Do not republish these instructions as your own pattern.
What if my gauge is not 4 stitches and 5 rows to the inch?
- Keep the inch targets and change the counts.
- The laptop width is 13.1 inches after thickness, seams, and ease.
- At 4 stitches to the inch that is 53 single crochet.
- At 3.5 stitches to the inch, 13.1 times 3.5 is a different chain, and you do not still chain 54.
- The depth works the same way: 18 inches of fabric is 90 rows only at 5 rows to the inch.
- Crochet gauge is the swatch, measured flat, in the middle.
- Write your rates on the card with the device measurements before you chain.
Why will the device not go in when I followed the example?
- The example’s inches are not your device, or the thickness was left out, or the gauge was tighter than the example and the example’s stitch count was used anyway.
- A 0.6 inch laptop and a 0.9 inch laptop do not share 53 stitches.
- A paperback with a 1 inch spine does not share the 0.5 inch sum that produced 24 stitches.
- Seams do not add width.
- Start the next rectangle from the sum: width plus thickness plus 0.25 inch seams plus 0.25 inch ease.
- Slide the device in before you weave the ends, while you can still rip the seam.
The two long edges are not the same length. What do I do?
- That is a wedge from a gained or missed stitch, usually at the turning chain.
- Chain 1 does not count.
- The first single crochet of the row goes into the first stitch, not into the chain.
- Count every ten rows.
- Rip back to the last mark that still had the right width.
- Do not ease the long side into the short side and seam it. That locks the slant in, and the opening tilts.
- The turning chain page is the longer account of the same mistake.
- Over 60 or 90 rows one extra stitch is enough to stop the fold meeting.
Where is the fold on the laptop and the paperback?
- The laptop rectangle is 90 rows, so the fold is row 45.
- The paperback rectangle is 60 rows, so the fold is row 30.
- Mark that row. Pin row 1 to the last row.
- If you have to stretch one layer to make the pins meet, the faces are uneven or the count drifted.
- An odd row total cannot split into two equal whole-number faces. Add or remove a row until it can.
- Do not fold off-center to hide a short side.
How do I seam without cupping the side?
- At the example gauge, 4 single crochet and 5 rows to the inch, a single-crochet seam is 4 single crochet over each 5 paired row ends.
- One single crochet in every row end packs the seam tighter than the fabric and the side cups.
- A whipstitch is one stitch per matching pair of row ends, snug and not yanked.
- Match row ends.
- Check the device still enters after the seam is in.
- A seam that looked even on the empty fold can pinch the thickness you added on paper and then forgot in the sewing.
The earbud case is 27 stitches. Can I add a drawstring?
- Not on 27. The small eyelet repeat needs an even count.
- Work (single crochet 8, increase) three times to reach 30.
- Then fifteen repeats of (single crochet, chain 1, skip 1).
- Then a round that puts 1 single crochet in each single crochet and each chain-1 space so you are back at 30.
- Do not skip stitches inside the eyelet round to force it over 27.
- The last hole comes out short and the cord bunches.
- The drawstring bag is the full version of that hole-and-cord method.
Why does the round base ruffle or cup?
- A ruffle is too many increases for the count.
- Rounds 1 to 4 of the earbud base add six each: 6, 12, 18, 24.
- Round 5 adds only three, to 27.
- A full six increases on round 5 makes 30.
- Rip the extra increase round rather than skipping increases afterward to use them up.
- A bowl that appears before you wanted one is a tight magic ring or tight stitches in the first rounds.
- Close the ring without puckering the first round, and rework rounds 1 to 5 more loosely if the circle will not lie flat.
- Set the case on the circle. If the corners hang off, the tube is the wrong construction for that footprint.
The flap will not reach the button. Which one do I move?
- Lengthen the chain on row 6 before you move the button.
- The flap is 9 stitches for rows 1 to 5, and row 6 is single crochet 3, chain 4, skip 3, single crochet 3, worked over 9 of the 27 rim stitches.
- A flap that lost stitches comes to a point.
- A flap that gained stitches widens and the loop sits off to one side.
- Count 9.
- Sew the button only with the case inside the pouch.
- An empty pouch is a thinner target, and the loop that fit it will not close over the case.
Where does the lip-balm loop go?
- At the open rim, so the closed base hangs down and the cap points up.
- A loop sewn to the base flips the sleeve and the tube slides out.
- Nine stitches is the tube: 0.65 times 3.14 is 2.04 inches around, and 9 stitches at 4 to the inch is 2.25 inches, about 0.2 inch of ease.
- Ten even rounds clear the cap.
- If the balm falls out, the tube is loose, not the loop. Recount the 9 before you add rounds.
Is this drop protection?
- No. Single crochet has gaps, and yarn does not absorb a fall.
- The case keeps lint, scratches, and loose keys off the gear.
- It is not waterproof. Say so to anyone you give one to.
- Rain and a spill go through.
- Take the device out before you wash the case, and put it back only when the cotton is dry.
- Damp cotton marks metal and cockles paper.
- Dryer heat can shrink the cotton until a case that fit no longer does.
Can I use the strap-bag body counts for a laptop?
- No. The strap bag’s phone example is about 15 stitches and 70 rows for a 3.0 by 6.0 by 0.35 inch phone.
- The shoulder example is about 27 stitches and 66 rows.
- The laptop on this page is 53 stitches and 90 rows.
- They are the same folded-rectangle method and different arithmetic.
- A laptop started on 27 stitches will not accept the machine.
- Measure, add thickness, seams, and ease, then multiply by your gauge.
Next
For the single most-requested flat case, see the worked phone case. For a cup that is wider at the top, the tumbler sleeve adds the taper. For an opening that gathers shut, the drawstring pouch guide teaches the eyelet-and-cord closure. If your counts keep drifting on a long piece, the fix is upstream in crochet gauge.
- device case
- sleeve
- pouch
- beginner
- how to
Read this next
- How to Crochet a Christmas Tree Garlic Holder A small mesh garlic holder with scalloped branches, a gold star, and an open top. US terms. Sizes are design targets.
- How to Crochet a Christmas Tree Plastic Bag Holder Crochet a hollow Christmas tree that holds grocery bags. Bags go in the open top and out the brown trunk. US terms. Sizes come from gauge.
- How to Crochet a Compact No-Slip Kitchen Towel Holder A compact cotton crochet towel holder with two wooden rings, one above the other. Assembly counts are still being checked. US terms.