

How to Crochet a Fall Leaf
Work around both sides of a chain and change the shape only by stitch height. Two sizes are counted, then add veins and a stem.
A flat fall leaf worked around both sides of a chain, shaped only by stitch height. Two sizes, every stitch counted, plus veins and a stem. US terms.
At a glance
- Skill level
- beginner
- Time
- One round around a chain, a stem, optional veins
- Finished size
- Small; depends on yarn and hook
- Yarn weight
- Worsted in rust, gold, or olive
- Hook size
- US G/6 (4.0 mm) to start
- Yardage
- Not weighed. A few yards.
On this page
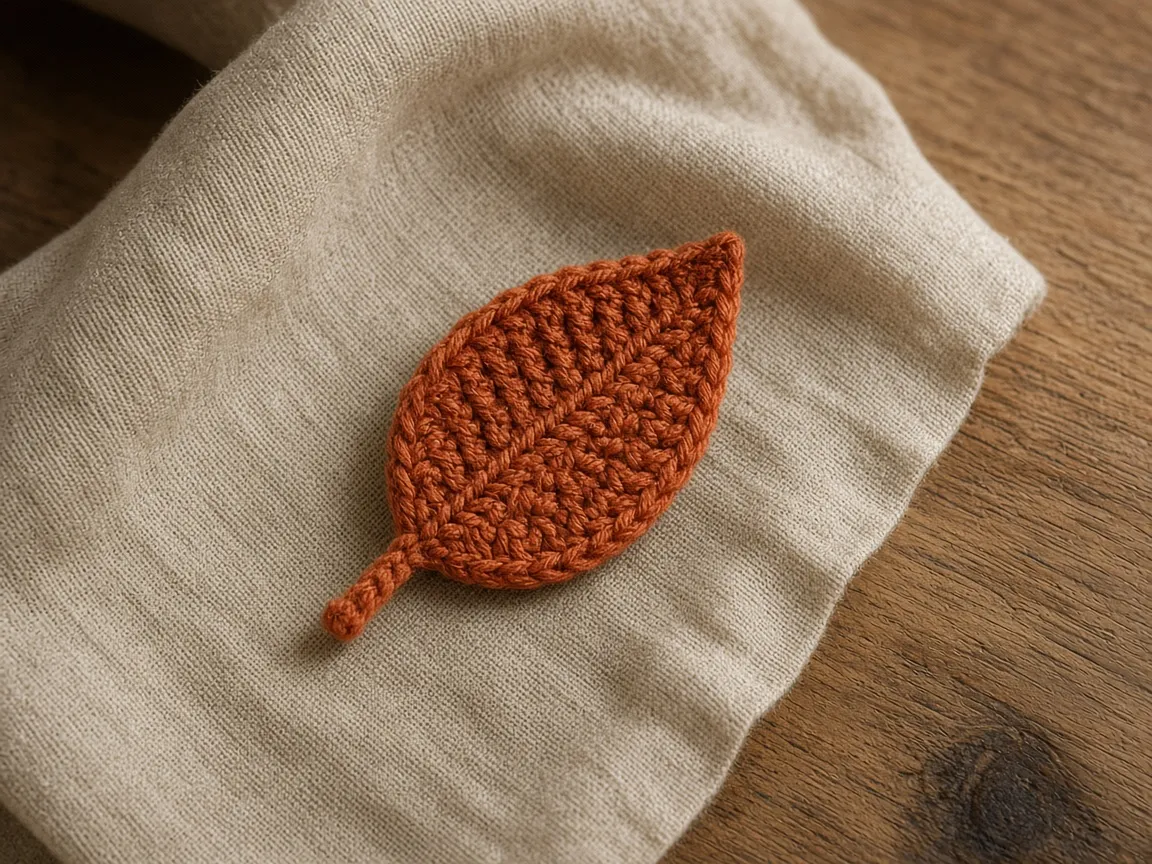
A fall leaf is a small flat appliqué. Sew it to a pumpkin, a drawstring treat bag, or a mug cozy, or string a few into a garland.
It also teaches a technique that shows up in a lot of motifs: shaping with stitch height alone. There are no increases or decreases. You chain a short line, then work one row of stitches up one side of the chain and back down the other. Short stitches at the ends and tall stitches in the middle make a pointed oval. Change the order of heights and you change the shape.
US terms. US single crochet is UK double crochet, and US double crochet is UK treble. Abbreviations. The pictures are illustrations of the finished leaf, and the inch sizes come from gauge, so measure as you go.
How the shape works
Each stitch height is roughly a step: a single crochet is short, a half double is taller, a double taller again. Laid along a chain, they make a curve. Work the same curve on the other side of the chain and you get a symmetrical leaf. Three stitches crowded into the end chain turn the work around the corner and make the point.
What you need
- Worsted-weight yarn in rust, gold, or olive, plus a scrap of brown or green for the stem if you want contrast. Yarn weights.
- US G/6 (4.0 mm) hook. A smaller hook makes a neater, smaller leaf. Hook chart.
- Yarn needle.
Gauge does not change the shape, only the size. For a matching set, make one leaf, then copy the hook and the chain tension.
The small leaf
Work along one side of the chain, around the tip, and back along the other side. Do not turn.
Chain 9.
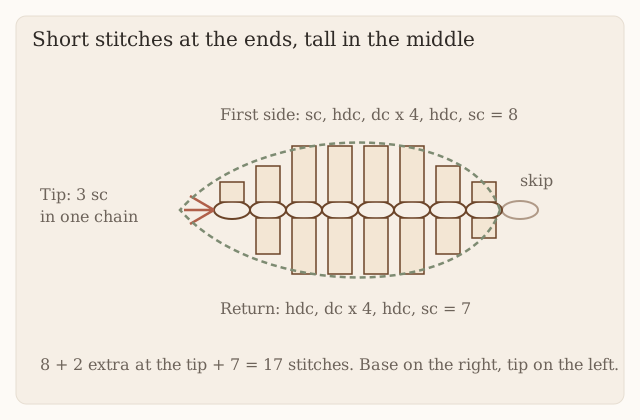
First side. Starting in the 2nd chain from the hook: sc, hdc, dc in each of the next 4 chains, hdc, sc. (8)
That uses 8 chains: 1 + 1 + 4 + 1 + 1 = 8. The chain closest to the hook is skipped, and the last stitch lands in the first chain you made. That first chain is the tip.
Tip. Work 2 more sc into that same chain, so it holds 3 sc. (10 so far)
Return side. Rotate the work. Working into the free loops on the underside of the chain: hdc, dc in each of the next 4 chains, hdc, sc. (7 more, 17 total)
That uses the remaining 7 chains. The return side has no single crochet at the tip end because the tip already has three.
Sl st into the first sc. Fasten off with a long tail for sewing.
Count check. If the return side runs out of chain early, a stitch on the way out landed in the wrong chain. If it has chains left over, one was skipped.
The larger leaf
The same plan, with a longer middle.
Chain 13.
First side. Starting in the 2nd chain from the hook: sc, hdc, dc in each of the next 8 chains, hdc, sc. (12)
Tip. 2 more sc in the last chain. (14 so far)
Return side. In the free loops: hdc, dc in each of the next 8 chains, hdc, sc. (11 more, 25 total)
Sl st into the first sc. Fasten off.
The check is the same: 1 + 1 + 8 + 1 + 1 = 12 on the first side, 11 on the return, and 2 extra at the tip.
The stem
Join the stem color at the base, the end opposite the tip. Ch 6. Slip stitch in the 2nd chain from the hook and in each chain back to the leaf. (5 slip stitches) Fasten off and weave that short end into the stem.
Veins (optional)
With a contrasting color or a darker shade, work surface slip stitch from the base to the tip, down the middle: hold the yarn behind the leaf, insert the hook from front to back, pull up a loop, and pull it through the loop on the hook. Work along the line of the chain. One center vein is enough on the small leaf. On the large leaf, add two short side veins angled toward the tip.
Alternatively, embroider the veins with a yarn needle and backstitch.
Mark the turning tip of the chain
For the small leaf, mark the first chain made: it is the far tip, reached after the eight first-side stitches. All three tip sc go into that same chain. Rotate and begin the return side in the next unused chain loop, not the tip chain again. Seven return stitches give seventeen total. The skipped chain nearest the hook remains unworked. For the larger leaf the corresponding totals are twelve outward stitches, two additional tip sc, and eleven back: twenty-five. The stem attaches at the joined base, opposite the marked tip, so the leaf and stem do not share the wrong end.
Troubleshooting
It twists. The return side went into the front of the first-side stitches, not the free loops of the chain. Undo to the tip and use the underside loops.
The tip is blunt. The 3 sc are spread across two chains. All three go in the end chain.
It cups. The chain is tighter than the stitches. Chain with a hook one size larger.
One side is fatter. A stitch height is different between the sides. Compare the list.
The stem curls into a corkscrew. The slip stitches are tighter than the chain. Chain more loosely, or use a larger hook for the stem.
Customizing
Change the heights to change the shape. More doubles in the middle make a longer, slimmer leaf, like the larger version. Treble crochet in the middle makes it wider. Single crochet all the way along makes a narrow willow-like strip. Two colors of leaf on one pumpkin read as fall without any other decoration.
For a garland, chain a cord long enough for the window and sew the leaves on, spacing them evenly.
Frequently asked
Should I block it?
If it cups, yes. Pin it flat and steam lightly, or wet-block cotton. Blocking.
Can I use it on a baby item?
Sew it on firmly all the way round and check that the stem cannot pull free. A loose appliqué is a poor idea on anything a baby can mouth.
What should I make next?
The same sewn-on idea is the simple flower. A flat motif worked in rounds instead of around a chain is the snowflake.
- fall
- leaf
- applique
- beginner
- halloween
Read this next
- Christmas Granny Square Variations Four color layouts for a classic granny square in Christmas colors, how to join them into a blanket or set, and why red and green so often turn muddy.
- Crochet Santa Amigurumi for Beginners A one-piece Santa body and head, a hat, beard, and belt, with every round counted and a stitch-counting method for placing the face so it is not lopsided.
- How to Crochet a Gnome, Step by Step A crochet gnome from four pieces: a body worked top down to a flat weighted base, a tall hat, a big nose, and a beard. Every round counted. US terms.